Monday, May 30, 2011

Stuffed Twists Tutorial

The mini-twists lasted for two weeks and I couldn’t take it anymore.  I didn’t use gel to do the twists so they started to unravel and frizz really bad.  Next time I’m going to make some flax seed gel and use that to twist my hair.  I’m sure they will last longer then.

I decided to go with another protective style for the week.  I chose the stuffed twists with a bun in the back.  This is a super easy style that you can do in less than two hours.  I will leave it in a week, so investing a couple of hours in my hair for the week isn’t too bad.

I washed, conditioned and moisturized my hair.  I two strand twisted my hair and allowed it to air dry while I was deciding what to do.  I went to the beauty store and bought four bags of the 99 cents braiding hair.  I think the stuffed twist look better with the cheap hair.

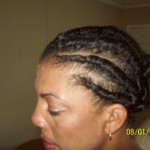
To do this style you want to start by placing a small pony tail in the back of your hair, this will serve as your base and is where you will start to pin your bun.  Part and gel a section of your hair.  Separate the weave and use a cigarette lighter to burn the hair right in the bend of the weave. Pressed the burned piece to form a point.  Use the burned piece at the start of your twist and then twist your hair over the weave. 

There you have it, a simple stuffed twist.   Twist the weave all the way to the end and it will coil, pin the end into the base pony tail and start with a new section.

Super simple!!!!
Ms. RosieVelt

Jump Start Your Hair Growth

Black women can grow long hair.  I know, I know, I know….I didn’t think that we could grow hair past our shoulders but I was wrong.  And oh boy, how learning this little tidbit has changed my life.  I’ve become obsessed with growing my hair to its full potential and I want to share my knowledge with everyone that I come in contact with. 
Jump starting your hair growth journey isn’t hard to do.  It just takes commitment from you to learn your hair and to learn how to take care of it.  Click on the link to learn how to jump start your hair growth journey.  

Ms. RosieVelt

Preparing my Hair for Bed

One major part of my healthy hair care journey regimen is preparing my hair for bed at night.  Preparing my hair at night for bed helps my hair retain moisture and wards off hair breakage.   My hair is super moisturized in the morning and I tell you I’ve shaved at least 5 minutes off my morning routine because I don’t have to spend as much time doing my hair.
Preparing your hair for bed is simply moisturizing, sealing and covering your hair before you go to bed.  It’s an essential step in growing long black hair.  You should really make preparing your hair for bed a part of your hair care regimen.  Click on the link to read how to prepare your hair for bedtime.

Confessions of an Almost Product Junkie


I started my healthy hair journey in May, 2010, mainly because I’d burnt the back row of my hair out with a straightening comb. After that, I started researching how to grow my hair back really fast, when I stumbled upon a world that I didn’t even know existed; a world with black women, who were growing their hair long and beautiful. I wanted my hair to be long and beautiful, so every product the women who I was looking at were using, I had to have it. Whether the product was good for my hair or not, I had to try it. I found myself getting caught up in the products that I had to have for my hair that I started to lose focus on what I really wanted, which was healthy hair. I was starting to use way too much product on my hair. When I detangled my hair after I washed, the comb was full of hair. I couldn’t understand why my hair was betraying me. I stepped back, reevaluated my regimen and figured that I was doing too much to my hair. I went back to the basics, clean hair and scalp, conditioned and moisturized hair that is sealed with oil, and low manipulation and protective styles. That’s enough!!! I’ve been back to the basics for about three weeks now and my hair is already doing much better. I have less hair in my comb when I detangle and my hair is starting to flourish. I’m glad that I came to my senses before I’d gone broke buying every product that I learned of. I will not be a product junkie.

10 Protective Style Ideas with Tutorial Links

Ever get stuck when it comes to protective styling ideas? Well not any more. Here are 10 protective styles that can get anyone out of their slump.


Happy Protecting,
Ms. RosieVelt

Tuesday, May 17, 2011

Jill Scott Droped 50 Pounds.

Way to go Jill Scott!! With the help of a personal trainer, Jill Scott has worked off 50 pounds. And guys, I'm telling you that chick looks great! Her hair is banging and she's the cover model on the June issue of Ebony.  Yall check it out and let me know what you think about the new Jill Scott.


Sunday, May 15, 2011

Monday, May 9, 2011

Start Those Breaking Edges to Growing!!

Losing your hair can be quit an embarrassment, especially, if the hair loss is in the front of your head or at the nape of your neck. Your hair edges give a nice manicured look to any hairstyle, so it's important to keep them in tact and free from breakage. If you do notice some thinning or breakage along your edges then there are a few simple things that you can do to eliminate breakage and get those pesky edges back to being full and neat. Keep reading

Tutorial - Two Strand Twist Protective Updo Style with Banana Clip


This is a simple protective style that you can complete in about an hour and a half. Below is the tutorial for the style.  Have Fun!! and let me know how it turns out!!

`

Pre-Shampooing - How I Pre Poo My Natural Hair

What the Heck is Pre-pooing

Pre-Poo!?!? If you are like me, you could possibly feel overwhelmed with all the new healthy hair words and acronyms.  Pre-Poo is a strange word that I’d never heard before in my life but if it’s going to make my hair grow, then I had to learn everything I could about it.   So what the heck is pre-poo?

Pre-Poo is a short term for pre-shampoo and it’s a conditioning treatment that’s applied to the hair and scalp before you shampoo your hair.  Pre-pooing provides a barrier to protect your hair from the harsh elements in shampoo and leave your relaxed or natural hair stronger and softer. 

Pre-pooing should be practiced at least once a week  before shampooing.   You can buy a pre-shampoo hair treatment or simply mix your own by raiding your kitchen cabinet for a few key ingredients.  You will need a combination of oil and conditioner or moisturizer.

Simply mix and apply to your hair and scalp to leave for 30 minutes with or without heat.  Rinse, shampoo, condition and style.

There’s an unlimited combination of items that can be used as a pre-poo.  I’ll list both oils and conditioners or moisturizers that can be mixed for a pre-poo.

Oils  -  Avocado, Coconut, Castor, Olive      
Moisturizers or Conditioners – Honey, Molasses, Shae Butter, Conditioner

Have fun mixing and let me know how it turns out or if you have a pre-poo recipe that you would like to share with me.

Happy Hair Growth

RosieVelt